In the following sections we introduce the BioMedIT portal, how it works and how
to get started using it.
Please use the table of contents menu to the left or below to navigate the topics.
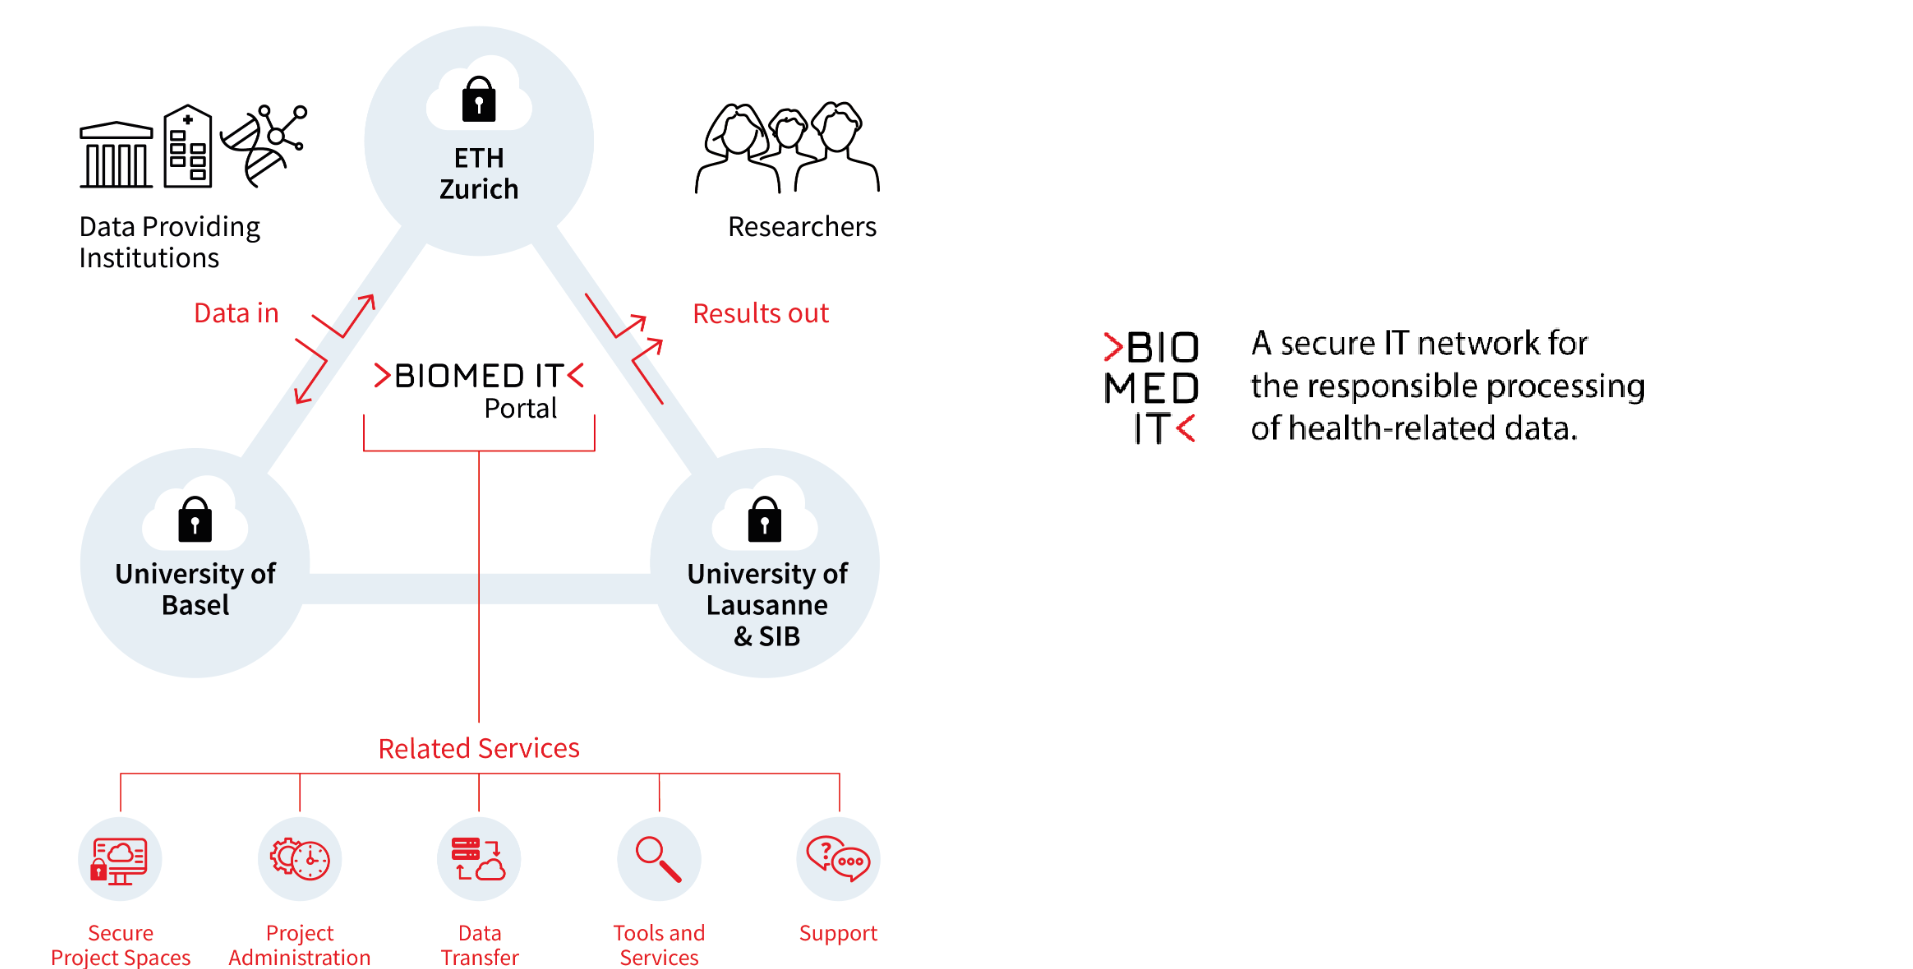
What is the BioMedIT Portal?
The BioMedIT Portal is the one-stop entry to the BioMedIT Network. It provides
users with a single point of access to the tools and services of the BioMedIT
Network in a secure web-based environment.
With the Portal:
Project Leads have a consolidated view of their projects and resources,
enabling them to manage the research team’s members and access the project
space.
Data Providers and Data Managers oversee data transfers and monitor them.
Researchers gain access to an expanding collection of collaborative and
research-oriented tools, which encompass in-house, commercial, and open-source
resources.
Access is secured with a login with your SWITCH
edu-ID account and two-factor
authentication.
Table of Contents
1 - Login
To either register for the first time or login to the BioMedIT portal:
As soon as you log in with your SWITCH edu-ID, the home
page displays the menu bar of the left side, the Quick Access Panel, with
short-cuts to central services in the middle, and the BioMedIT Feed on the
right, where you may find news and announcements from the BioMedIT Team.
The Portal classifies user accounts by role, and the menu options visible for
each user will depend on the role assigned. A Data Provider, a Project Leader,
or a visitor without a specific role will all see different default menu options
Local Username: The username the user chose during their first login to
Portal.
Email: Contact email currently selected from the list retrieved from the
user’s SWITCH edu-ID
Affiliations: List of organizations (e.g., university, research institute)
linked to users SWITCH edu-ID account
IP Address: The IP address from where the user is connecting
Flags: List of flags enabled for the user
Groups: The list of Groups the user is a member of.
Note that personal details are retrieved from the user’s SWITCH edu-ID.
For any changes to their personal data or affiliated organizations, user may
update their SWITCH edu-ID via this link.
From the OpenPGP Keys page, users can see the PGP Keys they have registered
in the Portal, along with their status.
Each key has the following information:
Fingerprint: This is a unique identified for each PGP key. You should make
sure sure that this value is matching with the fingerprint of your key.
User ID: User ID associated with the PGP key. People usually have their
full name (and sometimes affiliation) in this field.
Email: Email address associated with the PGP key
Status: The approval status of your key. The list of key statuses is as
follows:
PENDING: a key approval request was submitted, but the key has not
been approved yet. This is a manual process and can take from a few hours or
up couple of days.
APPROVED: key is approved for usage within the BioMedIT network. Only
approved keys can be used to encrypt, sign and decrypt data packages that
are transiting via the BioMedIT network.
APPROVAL-REVOKED: approval of the key has been revoked by the BioMedIT
key validation authority.
KEY-REVOKED: key has been revoked by its owner.
REJECTED: key is not trusted by the BioMedIT key validation authority.
DELETED: key has been removed from the keyserver by its owner.
UNKNOWN KEY: key has not been registered on the BioMedIT portal. If it
is your own key, please register it. If it is the key of someone else,
please ask them to register their key.
Registering a new PGP key
Important
The key has been created, uploaded to the Open PGP keyserver, and
verified with the keyserver (i.e. the keyserver will send you an automated
email to verify that you have control over the email associated with the PGP
key). The standard way to generate a key pair in BioMedIT is via the Secure
Encryption and Transfer Tool - sett GUI application, but PGP keys generated
using other methods are also accepted (e.g. using the GnuPG command line
tools).
The PGP key is using one of the email addresses associated to your
SWITCH edu-ID.
You do not already have an APPROVED key registered on the Portal. Only one
key per user can be used for data encryption/decryption at any one time. If
you wish to register a new key and already have an approved key, please
contact the DCC to request the revocation of your current key (if you still
intend to use that key outside of BioMedIT) or revoke it yourself on the
keyserver (if you want to permanently revoke your key for all applications).
Once the above prerequisites are met, perform the following steps to register
your key and request its approval:
Connect to the BioMedIT portal and go to Profile and OpenPGP Keys tab.
Click on +OPENPGP KEY.
Add Key dialogue box will open. Enter your key’s fingerprint: please
copy-paste it from your computer to avoid typing errors. Then click on the
green search icon.
If your key is present on the Open PGP keyserver, the user ID and email
associated with your key will be retrieved and displayed in the dialog box.
Please double check that the value is correct.
If the displayed user ID and email values are correct, click on CONFIRM.
Your key is now registered and an approval request as been automatically sent to
the DCC. Please note that the verification and approval of your key by the DCC
is a manual process and may take a few days.
Note that your key’s approval status will be PENDING until approved by the
DCC. Once approved, the status will change to APPROVED, at which point the key
can be used to encrypt and decrypt data to be transferred into the BioMedIT
network.
SSH Keys
From the SSH Keys page, users can add their public SSH key for a
specific project.
Registering a new SSH key
Click on +SSH KEY.
Select the project from the drop-down list
Copy the content of your public ssh key
click on SAVE
Access Tokens (PAT)
From the Access Tokens (PAT) page, users can create and delete their
personal access tokens. Personal access tokens can be used to programmatically
interact with the BioMedIT Portal, by performing authenticated API calls.
Create a new Personal Access Token
Click on +PERSONAL ACCESS TOKEN.
Enter a name, a description and select the expiration date for
your token.
Click on SAVE.
Make sure to copy the token value and store it in a safe place, as it will not
be stored by the BioMedIT Portal, and you won’t be able to see it again. If you
lose it, you will have to create a new token.
Delete a Personal Access Token
Click on the trash icon next to the token you want to delete.
Confirm the deletion by clicking on CONFIRM in the dialog box.
Use a Personal Access Token
To use a personal access token, include it in the Authorization header of
your API requests, as follows:
Replace pat-abcdef1234567890abcdef1234567890 with your actual personal access
token. For more information about the BioMedIT Portal API, refer to the API
documentation.
The Data Provider roles are intended to provide Data Providing institutions with
the ability to manage the users involved in data transfers to BioMedIT and
assign permission levels according to their responsibilities.
DP Manager
The DP Manager represents the Data Provider institution within the scope of
BioMedIT. A DP Manager is responsible for the institution’s internal processes
related to BioMedIT and delegates responsibilities to other users in their
organization by assigning/removing DP roles. In addition, a DP Manager is
responsible for maintaining and keeping the roles assigned up to date, i.e., if
an employee left or changed responsibilities, and informing the BioMedIT Node
and the DCC accordingly. Finally, the DP Manager delegates the internal
operation coordination to the DP Coordinator.
DP Managers are:
Responsible for the ensuring data provisioning at the Data Provider institution.
Responsible for escalations and security incidents within the Data Provider.
Responsible to assign/revoke the DP roles to other DP users.
DP Coordinator
The DP Coordinator is responsible for internally coordinating the DP’s readiness
to send data, ensuring the legal compliance, i.e., DTUA, DTPA, etc. and all
technical measures required from the DP side are in place for projects in which
Data Provider institution participates. The DP Coordinator must send
confirmation of readiness for data transfers to the DCC when required, and act
as the single point of contact for follow-up questions and/or issues in the
process.
DP Coordinators are:
Responsible for coordinating internal data transfer processes of the Data
Provider institution
Responsible for confirmation of legal readiness for data transfers
Responsible for confirmation of technical readiness for data transfers
DP Technical Admin
The DP Technical Admin is responsible for all technical tasks required for the
setup and maintenance of a secure connection from the DP organization to the
BioMedIT Node e.g., network components configuration. He is also responsible to
support DP Data Engineer in the onboarding process. There could be more than one
DP Technical Admin.
DP Technical Admins are:
Responsible for the configuration of the network components from the DP side
to permit data transfers.
Responsible for supporting the onboarding of the DP Data Engineer(s).
DP Data Engineer
The DP Data Engineer is responsible to prepare, encrypt and sign the data
packages, and transfer them from the DP organization to the assigned BioMedIT
Node. There could be more than one DP Data Engineer.
DP Data Engineers are:
Responsible for preparing and executing the data package transfers between the
Data Provider and the assigned BioMedIT Node, following the BioMedIT process
for secure data transfer.
DP Security Officer
The DP Security Officer is the designated point of contact from the DP
organization to receive incident and security notifications from BioMedIT such
as (but not limited to) scheduled and non-scheduled downtimes in response to
security incidents, emergency changes and systems upgrades.
DP Security Officers are:
Responsible for serving as a point of contact for incident, maintenance and
security notifications from BioMedIT, and distributing them internally.
DP Viewer
A DP Viewer can monitor the status of data transfers from their DP institution.
How to add a user to a Data Provider group
Note
Only users with the role of DP Manager can add or remove
users from their organization.
The DP Manager role can only be assigned by the DCC (send an email to
biomedit@sib.swiss for updates).
Users must have have a BioMedIT portal account.
To add a user to a group:
Click on the edit button of the group.
In the Users field, type the user’s email address and click on +USER.
When no more users need to be added to the group, click on SAVE.
5 - Projects
In the Projects menu option:
Project users find a consolidated view of their projects, the data
transfers, and the tools and resources enabled for the project.
The details tab shows the project’s general settings:
Code: A unique identifier for the project
Hosting Node: Name and code of the node where the project is hosted
Archived: Yes / No
Expiration Date: Date when the project expires.
Legal Approval Group: Group responsible to confirm compliance with legal
basis and approve production DTRs.
Data Specification Approval Group: Group responsible to review data
transfer’s Data Specifications and approve production DTRs.
Legal Support Contact: Contact email address to engage support about
ethical and legal questions.
Enable SSH Access: Indicates if SSH access has been enabled for the
project.
Enable Resources: Indicates if resources have been enabled for the
project. The resources tab will be shown/hidden accordingly.
Enable Services: Indicates if services have been enabled for the project.
The services tab will be shown/hidden accordingly.
Identity Provider: Source user identity provider specified for the
project. By default is SWITCH edu-ID, but a
node-specific pre-defined identity providers may be selected.
IP Ranges: IP range(s) from where client connections to access B-spaces is
permitted.
If the user is connecting from an IP outside of the IP range, the message
“Your IP address is not within the valid IP address ranges of the project”
is displayed.
Data Import tab
The data import tab displays the list of data transfer requests submitted by
the project.
From the Search box, users can search for specific data transfer requests
by any content as search criteria.
+DATA IMPORT REQUEST: Function to submit a new Data Transfer Request. Note
that this option is only visible to the project’s Data Manager(s). The data
transfer request list is also accessible from the Data Transfers menu option.
Users tab
Displays the list of users and their role in the project.
This version number represents the last Terms Of
Use the user accepted.
Additional information tab
Notes, comments and relevant information details. Note that this field is only
editable by admins (Node Managers and BioMedIT Support).
Resources tab
Displays the access links to the node-specific tools and applications configured
for the project. It offers these fields:
Name
Location - a valid URL that points to the resource
Contact - a valid email address whom to contact
Description - a simple textfield
These resources are defined per project only. Because of this limitation, we
added the services tab (see below) which offer more flexibility.
Services tab
Similar to the resources tab but more flexible. Displays the node-specific tools
assigned to a given project as well as the tools assigned to individual members
of that project. The aim is that Portal serves as a central point for
node-specific information. The data field (see example below) allows the use
of markdown language which will be automatically nicely rendered as rich text in
Portal.
To create a new entry, node admins simply need to issue a POST request:
POST /backend/projects/<project_pk>/services/
{"name":"Special Tools","description":"A collection of special tools for a project","data":"# Title\n* feat 1 explained\n* feat 2 explained",#<-Markdownlanguage"state":"CREATED"#validstates:INITIAL,PROGRESS,CREATED,LOCKED,ARCHIVED}
Where the project_pk is the primary key of a given project (not the project
code). Node admins and -viewers will then see the service(s) nicely rendered in
the services tab.
To view, update or delete a project service entry, use the
endpoint and the GET, PUT or DELETE http verbs. service_pk is the
automatically assigned primary key of a service.
In addition, services can also be assigned to project members, by sending a
POST request to this endpoint:
POST /backend/projects/<project_pk>/members/<user_pk>/services
{"name":"Special Tools","description":"A collection of special tools for a project","data":"# Title\n* feat 1 explained\n* feat 2 explained","state":"CREATED"#validstates:INITIAL,PROGRESS,CREATED,LOCKED,ARCHIVED}
Where the project_pk is the primary key of a given project (not the project
code) and user_pk the primary key of the user. If the user is not member of
the specified project, you’ll receive a 404 error.
Once a project service is assigned to a project member, users then are able to
see the current state of their assigned project services in the services tab.
To view, update or delete a project service entry, use the
endpoint and the GET, PUT or DELETE http verbs. service_pk is the
automatically assigned primary key of a service.
Note 1: these services serve information purposes only, have no implicit
functionality. In particular, they do not trigger any mails being sent to the
user.
Note 2: the service name must be unique and a service can only be assigned
once to a project or project member. The service name can be freely chosen.
Note 3: currently the action field has no meaning or implicit
functionality.
Note 4: there is no GUI planned to edit service information data.
User Role History tab
This tab displays a full history of users and their roles in the project,
including who added/removed the user, and when.
This tab is only visible to node admins, node viewers, project leaders and
permission managers.
Terms of Use tab
Displays the Terms of Use of the node hosting the project. From this tab,
project users can read and accept the Terms of Use they have not accepted yet.
For details, see the Terms of Use page.
User roles
User roles are set for each project. Each authorized BioMedIT user can have
several user roles and can be assigned access to several projects.
Roles and responsibilities
Project Leaders (PL):
responsible and accountable for the project
responsible for the data lifecycle management of the project
acts as contact point for escalations and security incidents within the
project
responsible to discuss the setup and configuration of the project space for
the project with representatives of the BioMedIT Nodes
responsible for case-by-case authorization of Data Transfers out of the
B-space
assigned to the project in the User Role of “Permissions Manager” by default
and with that is responsible to assign authorized BioMedIT users
responsible to assign the User Role of “Permissions Manager” to authorized
BioMedIT users
responsible to ensure that at least one authorized BioMedIT user was assigned
to the project space in the User Role of “Data Manager”
can act as “Permissions Manager” and/or “Data Manager” and/or “(default) User”
responsible to revoke access rights to the project space
informed about every user change (add/remove) via email notification
there can be multiple PLs per project
Permissions Manager (PM):
accountable to the PL
each project must have at least one project member with the User Role of
“Permissions Manager”
responsible for assigning the User Roles of “(default) User” and “Data
Manager” to authorized BioMedIT users and with that granting them access to
the project space
responsible to revoke access rights to the project space
acts as contact for the new project members to support them with registration
and authorization as users of BioMedIT
Data Manager (DM):
accountable to the PL
each project must have at least one project member with the User Role “Data
Manager”
responsible for unpacking and decryption of data packages within the B-space
responsible to extract data from the B-space for transfer out of the project
space only following explicit authorization of the PL
responsible to place the request(s) for Data Transfer(s) from a Data Provider
to the project
User:
accountable to the PL
has access to one or several project spaces following authorization
responsible for data processing within the B-space
No Role:
accountable to the PL
can access the project’s details in the Portal, but has no access to the
B-space.
mutually exclusive with other roles
Managing project users
Note
This option is only visible to users with the Project Leader and/or
Permissions Managers role.
When clicking on the Edit project button the top-right corner, you will be
taken to edit page.
Adding users to a project
In the Users field, enter the user’s email address and click on +USER.
Note that the user(s) must have an account in the portal.
You will be asked to confirm the user’s details before adding it to the
project.
Review the details of the user, and click on ADD to confirm it.
You will return to the list of project users. Assign a role to the user by
clicking on the corresponding checkbox(es).
Click on SAVE.
Removing users from a project
To remove users from the project, the Project Leader or the Permissions
Manager should:
Click on the 'x' next to the user’s name.
After any change, click on SAVE
Submitting a Data Transfer Request
Important
This option is only available for users with the Data Manager role
Prior to submitting a DTR, SPHN projects are required to prepare the project’s
RDF Schema, external terminologies, and de-identification rules to ensure
compliance with the SPHN Semantic Interoperability Framework. For more
information, please consult the process
documentation.
To submit a Data Transfer Request (DTR), click on +DATA IMPORT REQUEST. The
data transfer creation form will be displayed.
Complete the required fields:
Unlimited / One Package: Select if the DTR will cover one or multiple data
transfers
Data Provider: Select the Data Provider from the drop-down list
TEST / PRODUCTION: Select TEST if mock data will be sent, or PRODUCTION if
the data will contain patient real data
Additional Data Recipients: Enter the email(s) of the data recipient(s)
and click on the +USER button.
Note that recipients can only be users with the Data Manager
role in the project.
Legal Basis: If transferring real data (purpose PRODUCTION), enter the
legal agreement (i.e. DTUA, DTPA) document name
Data Specification: If transferring real data (purpose PRODUCTION),
include the link to the Data Specification
You will be informed about the status of the approval process.
If you have any questions or need support, please contact biomedit@sib.swiss.
Kind Regards,
BioMedIT Team
DTR Approvals
When the DTR is created, the following approval requests are submitted in
parallel:
1. Node(s) Approval: As data processors, the involved node(s) must confirm
the presence of a pre-existing legal basis for the data transfer and ensure that
the necessary technical infrastructure is in place to support it.
2. Legal Compliance Approval: For SPHN/NDS projects, facilitated by the DCC
ELSI Help Desk group who verifies the existence of a legal basis (e.g., DTUA,
Consortium agreement) for the data transfer. For non-SPHN projects, a dedicated
local Legal Compliance group may be optionally configured.
3. Data Specification Approval: For SPHN projects, the DCC will review and
approve the data specification documents referenced in the ‘Data Specification’
link. This process ensures the compliance with the SPHN Semantic
Interoperability Framework.
Note
The Legal Compliance Approval (2) and the Data Specification Approval
(3) are exclusively required in transfers of real data. In any other case
(test data), they are excluded from the approval workflow.
Email example:
Subject: BioMed-IT Portal: [Action needed] DTR-999 - Data Transfer Request
from ‘Universitätsspital ABC’ to ‘SIB’ project
You are kindly requested to review and approve or reject the Data Transfer
Request associated with the SIB project by using the following Data Transfer
Request Approval form:
If you have any questions or need support, please contact biomedit@sib.swiss
Kind Regards,
BioMedIT Team
4. Data Provider Coordinator Approval: This approval request is triggered
only when the previous approvers, (1),(2) and (3) have submitted theirs.
The Data Provider Coordinator is then requested to confirm if the data delivery
has been approved through their internal governance processes.
When all approvers approve the request, the DTR status changes to AUTHORIZED,
and data can then be transferred. Notification emails are sent to all parties
involved in the data transfer:
Subject: BioMed-IT Portal: [For information] DTR-999 - Data Transfer Request
from ‘SIB Data Provider’ to ‘SIB Project’ project is approved
Dear All,
Clearance has been granted to transfer data in accordance with DTR 999 for
project SIB Project (sib_project).
The DP Data Engineer from SIB Data Provider is now authorized to encrypt, sign,
and transfer the data package(s) using the sett tool according with the agreed
procedures to the SIS node. Detailed instructions on how to use sett can be
found at https://biomedit.gitlab.io/docs/sett/.
Upon completion of the data package transfer, please inform the Project’s Data
Manager(s), Patricia Fernandez (patricia.fernandezpinilla@sib.swiss), so that
they can confirm the reception, integrity, and successful decryption of the data
package in the B-space.
For any further questions, please don’t hesitate to contact
biomedit@sib.swiss.
DCC (Data Specification) by Jane Muller (jane.muller@sib.swiss) at
2024-04-17 08:59:40
If any of them rejects the DTR, its status is set to UNAUTHORIZED.
Monitoring the approval status of a Data Transfer Request
The status of a DTR is displayed in the last column of the DTR list.
Approval Status
INITIAL: The DTR was submitted, but it has not yet been approved.
AUTHORIZED: All approvers have authorized the DTR. The Data Provider can now
send the data.
EXPIRED: The Data Provider sent the maximum allowed number of data packages,
and no additional data can be sent under this DTR ID
UNAUTHORIZED: The DTR was previously authorized but is currently
unauthorized for some reason (i.e., The BioMedIT Node is offline, problems
with user permissions, issues on the Data Provider's end, etc.)|
Data Transfer details
When clicking on a particular data transfer, you will navigate to that data
transfer’s details page, which contains the following tabs:
Displays the attribute values of the DTR as submitted by the project’s data
manager.
Logs tab
Displays the individual data packages transfer logs - routing information and
whether the data has arrived to the project workspace.
Approvals tab
Displays the current approval status of a DTR by all approval groups.
6 - Data Transfers
In the Data Transfers menu option:
Data Managers and Data Providers can search and view the list of
submitted Data Transfers Requests (DTRs), monitor their
authorization status and transfer
logs
The approval status of a DTR is displayed in the last column of the table:
INITIAL: The DTR was submitted, but it has not yet been approved by the Data
Provider and/or the BioMedIT node(s).
AUTHORIZED: All approval groups have authorized the DTR. The Data Provider
can now send the data.
EXPIRED: The Data Provider sent the maximum allowed number of data packages,
and no additional data can be sent under this DTR ID
UNAUTHORIZED: The DTR was previously authorized but is currently
unauthorized for some reason (i.e., The BioMedIT Node is offline, problems
with user permissions, issues on the Data Provider's end, etc.)
Additional details about which group approved when are shown when clicking on a
specific DTR. See approval details
Data Transfer details
By clicking over a data transfer, users can display the data transfer’s details:
Displays the attribute values of the DTR, as submitted by the project’s data
manager:
Project: Name of the project
Transfer ID: Unique DTR identifier
Data Provider: the Data Provider code
Status: Approval status of the DTR
Max Number of packages: 1 (single transfer) or UNLIMITED (multiple data
transfers)
Transferred Packages: Count of packages sent so far under this DTR ID
Requestor: Name of the Data Manager that submitted the DTR
Data Specification: link to the Data Specification
Purpose: TEST (for mock data) / PRODUCTION (for patient real data)
Legal Basis: Legal agreement (i.e. DTUA, DTPA) document name
Approvals tab
Displays the current approval status of a DTR.
Logs tab
Displays the individual data packages transfer logs - routing information and
whether the data has arrived to the project workspace.
For each data package we display the following information:
Package Name: the filename of the data package
Sender: information about the user who signed the data, including (at
least) their fingerprint
Arrived: the date and time when the data package was sent by the sender
and received on the landing zone
Deleted: the date and time when the data package was deleted from the
landing zone
In the detailed view of a data package, the following information is also
displayed:
Recipients: information about the user(s) for whom the data was encrypted,
including (at least) their fingerprint
Approving DTRs
When the DTR is submitted by a project’s Data Manager, the groups involved in
the data transfer will receive a notification by email with all the details, for
their information or for their action (request for approval), depending on the
case, as explained below.
Example:
Subject: BioMed-IT Portal: [For Information] DTR-999 - Data Transfer Request
from ‘Universitätsspital ABC’ to ‘SIB’ project
Dear Universitätsspital ABC,
We have received the following Data Transfer Request (DTR-999) from the
sib_project Project:
Please note that Data Provider approval will only be available upon completion
of approvals from the Nodes, DCC (Data Specification), ELSI Help Desk.
If you have any questions or need support, please contact biomedit@sib.swiss
Kind Regards,
BioMedIT Team
Approvals
When a DTR is submitted by a Data Manager to a research project, the following
approvals must be collected:
1. Node(s) Approval: As data processors, the involved node(s) must confirm
the presence of a pre-existing legal basis for the data transfer and ensure that
the necessary technical infrastructure is in place to support it.
2. Legal Compliance Approval: For SPHN/NDS projects, facilitated by the DCC
ELSI Help Desk group who verifies the existence of a legal basis (e.g., DTUA,
Consortium agreement) for the data transfer. For non-SPHN projects, a dedicated
local Legal Compliance group may be optionally configured.
3. DCC Data Specification Approval: For SPHN projects, the DCC will review
and approve the data specification documents referenced in the ‘Data
Specification’ link. This process ensures the compliance with the SPHN Semantic
Interoperability Framework.
Note
The approval requests above, (1), (2) and (3), are submitted in parallel
The Legal Compliance Approval (2) and the Data Specification Approval
(3) are exclusively required in transfers of real data. In any other
case (test data), they are excluded from the approval workflow
Only when the above groups, (1), (2) and (3) confirm their approval, the DP
Coordinator is requested to submit theirs:
Example:
To: DP Coordinator Subject: BioMed-IT Portal: [Action needed] DTR-999 - Data Transfer Request
from ‘Universitätsspital ABC’ to ‘SIB’ project
Dear Universitätsspital ABC ,
You are kindly requested to review and approve or reject the Data Transfer
Request associated with the SIB project by using the following Data Transfer
Request Approval form:
To approve the DTR, click on APPROVE and declare, by clicking on the
checkboxes, if:
All technical measures are in place to send the data
There is an existing legal basis for the Data Transfer
This data delivery has been approved through internal governance processes
Then, click on APPROVE.
To reject the DTR, click on REJECT and provide a reason for the rejecting.
Then, click on REJECT.
When all approvers approve the request, the DTR status changes to AUTHORIZED,
and data can then be transferred. Notification emails are sent to all parties
involved in the data transfer:
Subject: BioMed-IT Portal: [For information] DTR-999 - Data Transfer Request
from ‘SIB Data Provider’ to ‘SIB Project’ project is approved
Dear All,
Clearance has been granted to transfer data in accordance with DTR 999 for
project SIB Project (sib_project).
The DP Data Engineer from SIB Data Provider is now authorized to encrypt, sign,
and transfer the data package(s) using the sett tool according with the agreed
procedures to the SIS node. Detailed instructions on how to use sett can be
found at https://biomedit.gitlab.io/docs/sett/.
Upon completion of the data package transfer, please inform the Project’s Data
Manager(s), Patricia Fernandez (patricia.fernandezpinilla@sib.swiss), so that
they can confirm the reception, integrity, and successful decryption of the data
package in the B-space.
For any further questions, please don’t hesitate to contact
biomedit@sib.swiss.
DCC (Data Specification) by Jane Muller (jane.muller@sib.swiss) at
2024-04-17 08:59:40
If any of them rejects the DTR, its status is set to UNAUTHORIZED.
Download data transfer list
By clicking on the download icon at the top-right corner, users can download the
list of DTRs in csv format.
7 - Terms of Use
Terms of Use (TOU) are acceptable use policies associated to BioMedIT
compute Nodes that must be agreed to by BioMedIT users.
Each BioMedIT Node can specify its own Terms of Use.
Each TOU has a version number.
Each TOU has a version type, which is either MINOR or MAJOR.
Every user that uses the services of a Node must read and accept the Terms of
Use.
TOU are found in a Terms of Use tab, located on a detail page that depends
on the type of user:
Regular users find the TOU under a
Project’s detail page, in a tab named
“Terms of Use”.
Node Admins, Node Viewers, and Portal Admins can additionally
find the TOU under a
Node’s detail page.
Terms of Use for project users
Every project is assigned to a specific Node, and every Node has its own Terms
of Use (TOU). Users of any given project need to read and accept the TOU once
per Node.
Project users access the TOU from a project’s detail page, under the
Terms of Use tab. There, all users see a READ AND ACCEPT button for the
TOU they have not accepted yet.
Read and accept Terms of Use
The READ AND ACCEPT button takes users to the read and accept page, where
TOU are displayed along with a checkbox:
[x] I have read and understood the Node’s Terms of Use,
followed by a CONFIRM button. Once a user confirms, the Node Admin gets
notified by email. TOU cannot be rejected after they have been accepted.
The latest accepted version of a Node’s TOU appears in the Users tab of
the project.
Terms of Use for Node and Portal Admins
Portal Admins, as well as Node Admins and Node Viewers can access Node Terms
of Use (TOU) via the Nodes page. TOU for a given node are available in the
Node’s detail page, under the Terms of Use tab.
Note
The Nodes page is only available to Portal Admins, Node Admins,
and Node Viewers.
Adding new Terms of Use
From a Node’s Terms of Use tab, a Node Admin can add a new TOU policy by
clicking the + TERMS OF USE button. The Node Admin then needs to specify the
Node for which this TOU is valid, a version number (it is recommended
to follow the major.minor syntax, e.g. 2.3) and a version type (MINOR
or MAJOR) that indicates the magnitude of change compared to the previous
version of the document.
The actual text for the TOU must be written in
Markdown format, which then will
be rendered on screen. Once entered, the text cannot be altered anymore.
Therefore make sure you create and review the text before you publish it.
When a new version of the TOU is created, all the users of this Node get
informed by mail, and reminded that they need to accept the new TOU in order
to continue using the service. Note that there is currently no mechanism
implemented to block users that did not agree to TOU.
Read Terms of Use
By clicking on a single TOU, a new screen is shown where the details of the TOU
are presented. An additional users tab shows the list of users who have
already read and accepted this version of TOU.
Download TOU list
A blue download button in the Terms of Use tab allows downloading all
TOU in a CSV file. This file lists TOU for all Nodes, all versions, and all
users that accepted them, including the date they have been accepted.
8 - Contact Us
It is the contact form to submit feature requests or support to the BioMedIT
Help Desk (biomedit@sib.swiss).