![]()
Welcome to the official sett documentation page.
Please use the table of contents menu to the left or below to navigate the topics.
This is the multi-page printable view of this section. Click here to print.
sett stands for “Secure Encryption and Transfer Tool” and is an application that facilitates and automates data packaging, encryption, and transfer. It is written in Rust, a fast and memory-safe programming language.
sett is available in 3 different user interfaces:
For a detailed overview of what sett can do, please refer to the sett functionality overview section.
sett is developed as part of the BioMedIT project. It is licensed under the GPLv3 (GNU General Public License) and the source code is available from its public GitLab repository.
sett is developed to be an “all in one” tool to send sensitive data to and from trusted research environments: secure computing environments designed to host sensitive biomedical data.
At its core, sett provides its users with the ability to compress, encrypt, send, and decrypt data in a sett-specific file format. This regroups the following operations, which are performed as a streamed process:
For BioMedIT users, sett also provides an authenticated mode, which seamlessly integrates with the BioMedIT Portal in oder to automatically:
Finally, sett also implements an OpenPGP key store that provide its users with all the essential functionalities for OpenPGP key management. This includes key generation, revocation, deletion, upload to and download from a keyserver, and key trust management.
We strongly recommend using sett to securely send data into the BioMedIT network. If for some reasons this is absolutely not possible, any alternative implementation of a data encryption and transfer tool is required to fully implement the minimum set of features listed below.
Requirements for data packaging and sending into the BioMedIT network:
Additionally, data packaging as per the above specifications requires having access to OpenPGP keys for encryption and signing of the data. OpenPGP key generation and management can be done via existing utilities such as Sequoia-PGP or GnuPG.
sett comes with 3 types of interfaces - please refer to the corresponding
sections of this quick-start guide:
For a complete guide on how to use sett, please refer to Encrypting, sending, and decrypting data and OpenPGP key management.
If you do not already have a private/public OpenPGP key pair, go to the Keys tab and create one by clicking on Add > Generate new key pair. See also the instructions given in the Generate a new public/private OpenPGP key pair section.
You should now see your new key listed in the Keys tab, along with a “Private” label indicating that the private material for this key is present in the local keystore.
If not already done, download the public OpenPGP key of the recipient(s) to whom you intend to send data (or from whom you will receive data).
Go to the Keys tab and click on Add > Import from keyserver. For details, see Download public OpenPGP keys from the keyserver.
After downloading a new OpenPGP key, verify it to make sure that it is genuine. This can be done by either:
Authenticated mode refers to a mode where sett users authenticate with the BioMedIT Portal service. This mode is therefore only available to BioMedIT users.
BioMedIT users are highly encouraged to use sett’s authenticated mode, which simplifies the encryption, transfer and decryption processes by providing a list of available Data Transfer Requests (DTRs) and by automatically fetching the required destination parameters and credentials (only for the S3 destination).
To access this mode, go to the Profile tab and click “Sign in”. You will be redirected to the BioMedIT authentication system. After successful authentication, proceed to the Encrypt and Send Data tab.
In the Encrypt and Send Data tab, proceed as follows:
Data to encrypt and/or send: add one or more files and directories to encrypt by clicking the Files or Directories buttons.
Sender: select your own OpenPGP key. This is the key that will be used to sign the encrypted data.
Recipients: add one or more recipients by selecting them in the drop-down menu. These are the keys for which the data will be encrypted, i.e. only these recipients will be able to decrypt the data.
Data Transfer ID: specifying a valid Data Transfer Request ID is mandatory when a data package is sent into the BioMedIT network.
For non-BioMedIT users, the Data Transfer ID field can be left empty (or set to an arbitrary value), and the Verify package checkbox must be disabled in the Settings tab.
Destination: from the drop-down menu, select a location to where the data should be encrypted and sent:
Click Encrypt data (local) or Encrypt and send data (s3 or sftp) to start the encryption workflow.
In the Encrypt and Send Data tab:
In the Decrypt tab:
The sett CLI mode uses subcommands to perform specific tasks.
Each subcommand includes a help message describing all available options.
Use -h for a short description or --help for a detailed explanation.
# Display the overall sett help.
sett --help

# Help for a specific subcommand.
sett encrypt --help
sett decrypt --help
sett keys --help

# Help for a specific subcommand of the `sett encrypt` subcommand.
sett encrypt local -h
sett encrypt local --help
Below are some basic examples of the most used sett subcommands.
# Generate a new OpenPGP key pair.
sett keys generate

# Import a public key from the keyserver.
sett keys import from-keyserver alice@example.com
Examples commands to encrypt and send (in a single step) an existing sett data package.
# Encryption and transfer to an S3 object store, in authenticated mode.
#
# * Option 1: using interactive authentication (via a web-browser) with Portal.
sett encrypt s3-portal \
   --signer SIGNER_KEY --recipient RECIPIENT_KEY --dtr DATA_TRANSFER_ID  \
   FILES_OR_DIRECTORIES_TO_ENCRYPT
# * Option 2: using a personal access token (PAT) for authentication.
sett encrypt s3-portal \
   --signer SIGNER_KEY --recipient RECIPIENT_KEY \
   --dtr DATA_TRANSFER_ID \
   --pat pat-vy0TY_lQNT3Yg-kw6rka5FGea2rjXx7RToHDZ_xnKsw \
   FILES_OR_DIRECTORIES_TO_ENCRYPT

# Encryption and transfer to an S3 object store, in non-authenticated mode.
sett encrypt s3 \
   --signer SIGNER_KEY --recipient RECIPIENT_KEY \
   --endpoint ENDPOINT --bucket BUCKET \
   --access-key ACCESS_KEY --secret-key SECRET_KEY \
   FILES_OR_DIRECTORIES_TO_ENCRYPT

# Data encryption only, saving to local disk.
sett encrypt local \
   --signer alice@email.com --recipient bob@example.com \
   --output . \
   FILES_OR_DIRECTORIES_TO_ENCRYPT
Examples commands to send an existing sett data package.
# Transfer to an S3 object store in authenticated mode.
#
# * Option 1: using interactive authentication (via a web-browser) with Portal.
sett transfer s3-portal SETT_PACKAGE_TO_TRANSFER
# * Option 2: using a personal access token (PAT) for authentication.
sett transfer s3-portal --pat pat-vy0TY_lQNT3Yg-kw6rka5FGea2rjXx7RToHDZ_xnKsw \
   SETT_PACKAGE_TO_TRANSFER

# Transfer to an S3 object store in non-authenticated mode.
sett transfer s3 \
   --endpoint ENDPOINT \
   --bucket BUCKET --access-key ACCESS_KEY --secret-key SECRET_KEY \
   SETT_PACKAGE_TO_TRANSFER

# Transfer to an SFTP server.
sett transfer sftp \
   --host HOST --username USERNAME --base-path DESTINATION_DIRECTORY \
   --key-path SSH_KEY_LOCATION --key-pwd SSH_KEY_PASSWORD \
   SETT_PACKAGE_TO_TRANSFER
Examples commands to decrypt an existing sett data package.
# Download and decrypt package from an S3 object store in authenticated mode.
#
# * Option 1: using interactive authentication (via a web-browser) with Portal.
sett decrypt s3-portal SETT_PACKAGE_TO_DECRYPT
# * Option 2: using a personal access token (PAT) for authentication.
sett decrypt s3-portal \
   --pat pat-vy0TY_lQNT3Yg-kw6rka5FGea2rjXx7RToHDZ_xnKsw \
   SETT_PACKAGE_TO_DECRYPT

# Download and decrypt package from S3 object store in non-authenticated mode.
sett decrypt s3 \
   --bucket BUCKET --access-key ACCESS_KEY --secret-key SECRET_KEY \
   SETT_PACKAGE_TO_DECRYPT

# Decrypt from the local file system.
sett decrypt local SETT_PACKAGE_TO_DECRYPT
The sett TUI (Terminal User Interface) provides an interactive interface to sett directly in your terminal. This mode is ideal if you wish to use sett interactively but do not have access to a graphical environment (e.g. because you are working on a remote server via SSH), or if you simply prefer this type of interface.
To launch the TUI, run the sett CLI executable without passing any arguments:
sett
You can download the latest version of sett for your operating system by clicking on the corresponding link above.
For a complete list of available versions, please visit the releases page.
As only the latest version of sett is officially supported and guaranteed to work, it is strongly recommended to always keep your local installation of sett up-to-date.
If you installed sett using the installer available for your operating system, sett will automatically check for updates and prompt you to install the newest version as soon as it's available.
If you are running a portable executable, make sure you regularly check this page and download the latest version of the executable.
To encrypt and decrypt data, sett uses public key cryptography. If you are not familiar with public key cryptography concepts such as public and private keys, revocation signatures, or keyservers you are advised to read this introductory section.
All key management operations can be performed using both the graphical user interface (GUI) and the command line interface (CLI) of sett.
In the CLI each command and subcommand provides a help message that can be used
to get more information about the available options (-h and --help for short
and long help message respectively). For example:
sett --help
sett encrypt local -h
sett encrypt local --help
A prerequisite to encrypt, decrypt, and send files with sett is to have a public/private PGP key pair.
To generate a new public/private key pair:
Go to the Keys tab and click on + Add. From the drop-down menu, choose Generate new key pair. A dialogue box will appear.
Fill-in the required fields:
Click Next to see the summary.
Click “Generate key” to create the new key pair (this can take a few seconds).
A new pop-up window will appear to confirm that the key was generated successfully and to display the revocation signature associated with the new key.
Copy the revocation signature to a safe location, ideally a password manager, and click Next.
The next screen of the pop-up window allows to upload the public part of the key to the keyserver. Make sure to check the checkbox to associate the key with your email address. To establish this association, the keyserver will send an email to verify that you are the legitimate owner of the email associated with the key. It also means that other people will now be able to search for your key on the keyserver using your email address, otherwise your key will only be searchable using its full fingerprint.
The new key should now be listed in the keys tab.
Now that your new OpenPGP key is created, make sure to register it in the BioMedIT portal.
To generate a new key pair using sett command line interface:
sett keys generate --name "Alice Smith" --email alice.smith@example.com
During the key generation process, sett will ask for a pass phrase (password) that will protect the private key. Please use a reasonably strong password and make sure to save it in a password manager.
If the password is forgotten, there is no way to retrieve or re-create it. Your OpenPGP key pair will thus become unusable and will need to be revoked.
After creating the new key, sett will display a revocation signature for it.
Make sure you keep it in a safe place, such as a password manager. Revocation
signatures can optionally be automatically exported to a file by using the
--rev-sig option:
sett keys generate --name "Alice Smith" --email alice.smith@example.com --rev-sig alice.rev
Go to the Keys tab.
Use the keys list subcommand.
sett keys list
In some situations (e.g., new computer setup, remote sett environment) you might need to copy or move your private key to a different machine. This can be done by exporting the private key to a file, transferring the file to the new machine, and importing it.
Click on the ... icon next to the key you want to export and select “Export
public and private key”.
Use the keys export subcommand:
# The key identifier can be its fingerprint, key ID or the user's email address.
sett keys export -o private_key.pgp -p alice.smith@example.com
Note that keys can also be exported in ASCII format (instead of binary) by
adding the -a, --armor option.
Click on the + Add button and select “Import from file or clipboard”.
Use the keys import subcommand.
sett keys import from-file -p private_key.pgp
Note the usage of the -p option to import both the private and public parts of
the key. If -p is omitted, only the public part of the key is imported.
Verify that the key has been correctly imported with sett keys list.
Ensure that you store any backed-up secret keys in a secure location and in an encrypted form (typically in a password manager).
sett allows users to upload their public OpenPGP key to a keyserver.
sett uploads keys to the OpenPGP keyserver.
keys.openpgp.org is a public keyserver for the distribution and discovery of public PGP keys. This service is GDPR-compliant, based on the open source software Hagrid, and already used by over 500'000 users worldwide. For more information about the service, please see this link.
... icon next to the key you want to upload and select “Upload
public key to keyserver”.Use the keys upload subcommand.
sett keys upload alice.smith@exaple.com
In order to also trigger email verification for your key, add the -v, --verify
option:
sett keys upload --verify alice.smith@exaple.com
If you are not a BioMedIT user, this section is not relevant for you and can be skipped.
OpenPGP keys used to encrypt, sign, and decrypt data within the BioMedIT network require the approval of the BioMedIT key validation authority. The information of whether a key is trusted or not is stored as key status in the BioMedIT portal. This is the reason why all OpenPGP keys used within BioMedIT must be registered with the BioMedIT portal.
When an OpenPGP key is first registered in the BioMedIT portal, its status is
initially set to PENDING (i.e. it is awaiting approval). A key must have the
APPROVED status before it can be used to encrypt or sign data packages within
the BioMedIT network.
The list of key statuses is as follows:
PENDING: a key approval request was submitted, but the key has not been
approved yet. This is a manual process and can take from a few hours or up
couple of days.APPROVED: key is approved for usage within the BioMedIT network. Only
approved keys can be used to encrypt, sign, and decrypt data packages within
the BioMedIT network.APPROVAL-REVOKED: approval of the key has been revoked by the BioMedIT key
validation authority.KEY-REVOKED: key has been revoked by its owner.REJECTED: key is not trusted by the BioMedIT key validation authority.DELETED: key has been removed from the keyserver by its owner.UNKNOWN KEY: key has not been registered on the BioMedIT portal. If it is
your own key, please register it. If it is the key of someone else, please ask
them to register their key.To verify that a key is trusted, sett connects to the BioMedIT portal and retrieves the status of the key. For this reason, it is important that BioMedIT users register their OpenPGP key with the BioMedIT portal.
In cases where sett is used outside of the BioMedIT project, or the portal is
not reachable, sett can still be used to encrypt, decrypt, and send data. In
this case, you need to uncheck Verify package in the Settings tab.
The status of a public key in the BioMedIT portal can be easily checked in GUI by going to the Keys tab and clicking on one of the keys. Approved keys will also have a green “Approved” badge.
Each BioMedIT user can only have 1 active OpenPGP key registered in the BioMedIT portal at any time.
If you wish to replace your currently active key with another one, please connect to the BioMedIT portal, go to the Profile / OpenPGP Keys tab and click on the “Retire Key” icon (Actions column) associated with your key.
The email associated with your OpenPGP key must be one of the emails associated to the SWITCH edu-ID account that you are using with the BioMedIT portal.
If the email associated to your OpenPGP key is different (e.g. a shared service email is used for your OpenPGP key), please contact the BioMedIT support.
To register a new OpenPGP key with the BioMedIT portal, proceed as follows:
Make sure you have successfully uploaded your key to the keyserver and that you have completed the email verification procedure with the keyserver (i.e. your key must be verified with the keyserver).
To make sure that your key is present on the keyserver and is verified, go to the keyserver home page in your browser and search for the email associated with your key. You should get a message saying that a key was found for your email address and the corresponding key fingerprint should be displayed.
Copy the fingerprint (40-character string) of your key.
Log in to the BioMedIT portal.
Go to the Profile / OpenPGP Keys.
Click on the "+ OPENPGP KEY" button, a dialogue box will open.
Note: if the button is missing, it is probably because you already have an active key in the portal. Each user can only have 1 active key at a time - see the information box above.
Enter your full key fingerprint (must be exactly 40 characters long) in the dialogue box, then press the green search icon to the right.
This will retrieve the User ID and Email address associated with the fingerprint from the keyserver and display them in the dialogue box.
Verify the user ID and mail address. If they are correct for your OpenPGP key, then click on Confirm.
A request to approve your key has now been sent to the BioMedIT key validation authority. Generally requests are processed quickly (in a matter of hours), but occasionally it might take slightly longer as this is a manual process.
Please contact the BioMedIT support if your key has not been approved after a couple of days.
In order to encrypt data for a specific recipient (who will be able to decrypt it), you will need to have the public OpenPGP key of that recipient(s) available in your local keyring.
To download a public PGP key from the keyserver:
In the Keys tab, click on + Add. From the drop-down menu, choose Import from keyserver. A dialogue box will open, allowing to search for public keys stored on the keyserver.
In the search field, enter either the full email address or fingerprint of the public key you are looking for and click Import key.
For instance, if searching for the key “Bob Test Key bob@example.com” with fingerprint “AEED7A96F339881F6FE8291464A1E0150613807D”, one can search for either “bob@example.com” or “AEED7A96F339881F6FE8291464A1E0150613807D”.
If the key you are looking for was found, you will see a success message with key details.
The keys import from-keyserver subcommand can be used to download public
OpenPGP keys from the keyserver.
sett keys import from-keyserver alice.smith@example.com
While it is not possible to remove an actual key from the keyserver, it is possible to remove all personally identifiable information from it (user ID and email). Such keys are called unverified.
To remove personal information associated with a key, go to the keyserver’s manage key page, enter the email associated to the key and click on Send link.
You will receive an email with further instructions on how to proceed to remove your key’s user ID and email from the keyserver.
Removing a key’s user ID and email from the keyserver makes it no longer searchable by email. It remains searchable by its full fingerprint.
Important: keys without user ID and email cannot be used within the BioMedIT network. Only remove your personal identifying information from a key if you are no longer using it.
Users are strongly discouraged from deleting keys from their local keystore. Instead of deleting a key, users should revoke it. Revoking a key informs others that the key should not be used any more, and is a safer way to handle unused or compromised keys.
Deleting private keys is possible from sett.
GUI: Click on the ... icon next to the key you want to delete and select
“Delete”.
CLI: Use the keys delete-private-key subcommand.
sett keys delete-private-key alice.smith@exaple.com
Deleting public keys is not possible with sett. However, it is possible to delete a public key by manually deleting the file containing the keys using your file explorer or a shell command.
In the local sett public keystore, keys are stored as files. They are named
after the fingerprint of the key’s primary key. For instance, a key with
fingerprint 3b17f529665fe012ef54f4a1714fdf98b6e828df would be stored under:
<keystore-path>/3b/17f529665fe012ef54f4a1714fdf98b6e828dfThe location of the keystore (<keystore-path> above) is operating-system
dependent:
~/.local/share/pgp.cert.d%UserProfile%\AppData\Roaming\pgp.cert.d~/Library/Application Support/pgp.cert.dYou can also get the exact location of the key in sett GUI:
... icon next to the key you want to delete and select
“Delete”.A prerequisite for revoking an OpenPGP key is to have generated a revocation signature for it. If the OpenPGP key to revoke was generated with sett, you should already have a revocation signature ready to use. If you do not have a revocation signature yet, you can generate one with GUI:
Click on the ... icon next to the key you want to generate revocation
signature and select “Create revocation signature”.
Fill-in the required fields:
Click Generate signature.
A new pop-up window will appear to confirm that the revocation signature was generated successfully. Copy the revocation signature to a safe location, ideally a password manager (anyone with access to a revocation signature can revoke the key for which it was generated).
If an OpenPGP key has been compromised, is no longer usable (e.g. password is lost), or should no longer be used for any other reason, it must be revoked.
A prerequisite for revoking an OpenPGP key is to have generated a revocation signature for it. If the key to revoke was generated with sett, you should already have a revocation signature ready to use. If you do not have a revocation signature yet, please refer to the generate a revocation signature section. Note that generating a revocation signature requires you to have access to the private part of the key and its associated password (otherwise anyone could generate a revocation certificate for any key).
Click on the ... icon next to the key you want to revoke and select
“Revoke” (only available for keys that include a private part).
Either paste you revocation signature from the clipboard or load it from a file. Proceed with caution, a revoked key cannot be “un-revoked”.
Click on Revoke key.
When expanding the revoked key from the List of available keys, you should now see the Revocation status as “Revoked”. From this point on, the key can no longer be used with sett.
If you have previously shared your key via a keyserver (e.g. keys.openpgp.org), you must also re-upload your revoked key to that keyserver. This will allow other users to update their local copy of your public key, informing them that it is no longer valid.
To upload your revoked public key, please refer to the Upload your public key to the keyserver. If your key was never present on any keyserver, this step should be skipped.
Using the sett GUI or TUI interfaces, it is not possible to revoke a key for which only the public part is present in your key store (e.g. if you deleted the private key by mistake, and then want to revoke the remaining public key).
To revoke a public key when its private part is no longer available, please use the sett CLI (command line interface).
Keys are revoked using the keys revoke subcommand.
# Revoke a key, generating a revocation certificate on-the-fly.
sett keys revoke alice.smith@example.com compromised "My dog ate it"

# Revoke a key when having access to an existing revocation certificate file.
# This allows revoking a certificate even in the absence of the private key.
sett keys revoke alice.smith@example.com --rev-sig revocation_signature_file.sig

# Optional but recommended if the key was ever shared via a keyserver: upload
# the revoked public key to the keyserver.
sett keys upload alice.smith@example.com
After a key has been revoked, it must be uploaded again to any keyserver where it is present, so that the revocation can be shared with others (unless the key was never shared in the first place). This can be done with sett as illustrated in the Upload your public key to the keyserver.
It is possible to set an expiration date for an OpenPGP key. This is useful to ensure that the key is not used indefinitely. It is possible to extend the expiration date at any time.
sett GUI warns you when your key is about to expire. On the Keys tab, you will notice an Expiring badge starting from three months before the expiration date. On top of that, a warning will be displayed every time you use that key for signing or decryption.
To set a new expiration date for your key from the GUI:
Click on the ... icon next to the key you want to update the expiration
date for.
Click on Update expiration date.
Choose a new expiry date.
Click on Set new expiry date.
Unlock your key by entering the password, if needed.
sett CLI warns you every time you use a key which is about to expire for signing or decryption. This happens starting from three months before the expiration date.
To set a new expiration date for your key from the CLI:
sett keys expire alice.smith@example.com --expiration 3y
For details about the supported time specifications for the --expiration
option, run:
sett keys expire --help
Public OpenPGP keys located in your GnuPG keyring are not automatically detected by sett, and they must be migrated to sett’s public keystore. In contrast, private keys present in GnuPG can be used in sett without migration (however, it is still possible to migrate them).
Note that to migrate public keys (e.g., keys from other people), you can simply re-download them from the keyserver as shown in the Download public PGP keys from the keyserver section.
GUI:
CLI: use the keys import from-gpg subcommand.
# The search term can be an email or fingerprint.
sett keys import from-gpg alice.smith@example.com
Public-key cryptography is a method for secure communication between two or more users. In this system, each user has a pair of unique keys consisting of a private key and a public key. Public and private keys are linked in the sense that, data encrypted with a given public key can only be decrypted with the matching private key, and data signed with a given private key will only be recognized by the matching public key.
Because these keys are based on the OpenPGP protocol, they will here be referred to as OpenPGP keys.
Public and private OpenPGP keys:
Public keys are used to encrypt data, as well as for verifying signatures made on files or emails. By design, public keys are intended to be shared with other people and therefore no particular effort is required to keep them secret. In fact, public keys are often uploaded to public servers, known as keyservers, where they are accessible to anyone. No password is required to use a public key.
Typically, public keys are used by data senders to encrypt data for one or more recipient(s), and by data recipients to verify signatures of files or emails (to ensure the sender is genuine).
Private keys, sometimes also referred to as a secret keys, are used to decrypt data, sign files and sign other people’s public keys. To increase security, private keys should always be password protected.
Private keys and their password must be kept secret at all times. Never share your private key or password with anyone.
Private keys should be stored in a directory only accessible by the key owner, and their password should be stored in a password manager.
Typically, private keys are used by data recipients to decrypt data, and by data senders to sign the files they encrypt.
sett uses the open source implementation of public-key cryptography provided by Sequoia-PGP: a modular OpenPGP implementation in Rust.
It is possible - and often desirable - to both encrypt and sign a file. This ensures that the data can only be read by the intended recipient, and that the recipient can be confident the sender is legitimate. This is precisely what sett does:
Each pair of public/private OpenPGP keys is identified by a unique fingerprint. Fingerprints are 40 characters long hexadecimal strings (digits and upper case A-F letters) that look like this:
238565936FCFF3F200219990941A3EC20555F781
Since nothing is preventing two OpenPGP keys to have the same user name and email address, it is critical that users always verify the genuineness of new keys before (or just after) importing them into their local keyring (i.e. their local OpenPGP key database).
Ensuring a key is genuine can be done in two different ways:
In public key cryptography, the sender encrypts a file using one or more recipient(s) public key(s). Once a file is encrypted, no one can read the file without having access to a private key that matches the public key(s) used for encryption. This ensures that only the intended recipient(s) can decrypt the file, because they are the only one to have access to the matching private key.
The objective of file signing is to guarantee to the recipient of a file (or email) that the sender is genuine, and not someone else trying to impersonate the sender.
To achieve this, the sender signs the file with their private key (password required), and shares their public key with the recipient (typically via a keyserver). The recipient can then validate the authenticity of the signature using the public key of the sender. Since public keys are non-sensitive, they can be distributed publicly. In fact they are intended for this purpose, hence their name.
In the unfortunate event that a user either i) forgets their private key’s password or ii) have their private key and password stolen/compromised, they will need a way to let other people know that their public key should no longer be trusted and used.
This is because:
This situation is what revocation signatures are for: by applying a revocation signature to a public key, and then sharing the revoked key with others (e.g. via a keyserver), the key owner signals that their key is now “revoked” and should no longer be trusted nor used. After a key has been revoked, it can no longer be used to encrypt/decrypt data with sett.
Revocation signatures can be generated at anytime from the private key, but the best practice is to generate them directly after a new key pair is created. This ensures that the revocation signature will be available even if the private key or its password is lost.
Since anyone with access to a revocation signature will be able to revoke the associated key, revocation signatures must be stored securely - e.g. in a password manager - and should never be shared with anyone.
Encrypting files for a specific recipient requires to have the recipient’s public key in one’s local keyring (a keyring is a local database containing OpenPGP keys). Similarly, verifying a signature on a file or a public key requires to have the signee’s public key available in one’s local keyring.
Public keys are not sensitive data, and therefore can be sent unencrypted via email. However, when having frequent key exchanges between multiple actors, sending public OpenPGP keys around by email quickly becomes cumbersome. A solution to this problem is using a so called keyserver to share public keys. Keyservers are public or private servers whose sole purpose is to store public OpenPGP keys and allow users to search for them.
The following instructions outline the process of encrypting, sending, and decrypting data.
sett offers 3 types of interfaces:
settIn the CLI, each subcommand includes a help message with available options. Use
-h for a short description or --help for detailed explanations.
sett --help
sett encrypt local -h
sett encrypt local --help
sett allows the encryption of any combination of individual files and
directories. The files are first compressed into a single data.tar.gz archive,
which is then encrypted with the public key of one or more recipient(s), and
signed with the sender’s key.
The encrypted data (data.tar.gz.gpg) is then bundled with a metadata file
.zip file, hereafter referred
to as a data package.sett ensures the integrity of the transferred files by computing checksums on each file that is packaged, and adding this information to the encrypted data. The integrity of each file is verified automatically upon decryption of the data package by sett, providing the guarantee that all files were transferred flawlessly.
Some useful definitions to know when using sett:
Data Package: .zip file produced by sett when encrypting and/or
sending data. A data package contains the encrypted data, a metadata file, as
well as the data sender’s signature information.
For more details, please refer to the sett data package specification.
Data Sender: person who is encrypting and sending data. sett uses the data sender’s private OpenPGP key to sign the encrypted data so that data recipients can be confident in who created and sent the data package. A data package can only have one data sender.
For more details on how data signing works, please see the introduction to OpenPGP section of this guide.
Data Recipient(s): person(s) for whom data is encrypted. sett uses the recipient(s) public OpenPGP key to encrypt data, and as a result only they can decrypt the data package. sett supports multi-recipient data encryption. The public key of all data recipients must be available in the sender’s local keystore.
For more details on how data encryption works, please see the introduction to OpenPGP section of this guide.
BioMedIT users should be aware of these additional constraints that apply when sending data into the BioMedIT network:
Data Transfer Requests ID (DTR ID): ID number (numeric value) that uniquely identifies a Data Transfer Request. A valid and authorized DTR ID must be specified each time that data is being encrypted and sent into the BioMedIT network. The DTR ID is added to the data package’s metadata information by sett. Non-compliant packages will be rejected.
Note that Data Transfer Requests can allow the transfer of multiple data packages, and therefore (if the DTR allows it), the same DTR ID can be used for multiple data transfers.
Data Sender: to send data into the BioMedIT network, a data sender must be assigned the role of Data Provider Data Engineer for the given project. The sender’s OpenPGP key must also be approved by the BioMedIT key validation authority. If these conditions are not met, sett will not encrypt the data.
Data Recipient(s): each data transfer into the BioMedIT network must be to a recipient assigned to the role of Data Manager for the given project. The recipient’s OpenPGP key must also be approved by the BioMedIT key validation authority. If these conditions are not met, sett will not encrypt the data.
By default, encrypted output files produced by sett are named after the pattern:
<project code>_<YYYYMMDD>T<HHMMSS>.zip
where:
<project code> is the abbreviation/code associated with the project. If
Verify package is disabled, no project code is added as a prefix to the
output file name.<YYYYMMDD> is the current date (Year, Month, Day).<HHMMSS> is the current time (Hours, Minutes, Seconds).Example: demo_20220211T143311.zip, here demo is the project code.
Using the sett command line interface when encrypting to the local file
system, it is possible to override the default output file naming scheme by
passing the -o, --output option.
Overriding the naming scheme is not possible when using the GUI or TUI interfaces, or when encrypting to a remote S3 or SFTP destination.
sett can write (encrypt and compress) data packages to 3 different destinations:
Local disk: data is compressed and encrypted to a .zip data package on
the local machine running sett. Such a data package can then be sent (also
using sett) in a second step.
Before encrypting data to the local disk, sett verifies that there is enough free disk space available on the local machine to save the encrypted output. If this is not the case, an error is raised. Since the compression ratio of the input data cannot be known in advance, sett uses the conservative estimate that the minimum disk space required is equal to the total size of all input files to be encrypted.
S3-compatible object store: an S3 object store is a remote server dedicated to data storage (i.e. a “cloud” storage service). When encrypting data to such a destination, the data is both packaged (compressed and encrypted) and sent in a single step. This is both faster (encryption/compression and transfer happen in parallel), and avoids duplicating data on the local machine (the packaged data does not need to be temporarily stored, as it is directly streamed to its destination S3 object store).
SFTP server: just like S3, an SFTP server is a “cloud” storage service (it simply uses a different protocol).
sett can read (decrypt and decompress) data packages from 2 different locations:
.zip data package
located on the machine running sett..zip package is both downloaded
decrypted, and decompressed in a single stream. No intermediate files are
created.Authenticated mode refers to a mode where sett users authenticate with the BioMedIT Portal service. This mode is therefore only available to BioMedIT users.
For BioMedIT users, encrypting, sending or decrypting data in authenticated mode is particularly convenient, as it allows sett to automatically retrieve information about the data transfers associated with a user and project (e.g. S3 connection information and credentials). Users have no longer to manually provide this information, which greatly streamlines their user experience.
BioMedIT users are therefore strongly encouraged to use authenticated mode for all their encryption, transfer or decryption operations.
More details on the authenticated mode can be found in its dedicated documentation section.
Most of the sett CLI usage does not require any interactive input from the user, except for the following two aspects:
sett encrypt s3-portal.However, the sett CLI can be fully automated (no interactive input needed at any point) with the following settings.
One of the following environment variables can be used to automatically pass the password of a secret OpenPGP key used to decrypt or sign data:
SETT_OPENPGP_KEY_PWD: password to unlock the secret key.SETT_OPENPGP_KEY_PWD_FILE: full path and name of a file containing the
password to unlock the secret key.Automated authentication with the BioMedIT portal can be done by passing a
Personal Access Token (PAT) via either the SETT_PORTAL_PAT environment
variable, or the --pat command line option.
When this variable/option is set to a valid PAT, sett CLI automatically authenticates with Portal, skipping the need for interactive (browser-based) login.
BioMedIT users can generate a PAT in their profile on the BioMedIT portal.
PAT are sensitive data and should be protected like passwords.
You should also be aware that using the --pat command line option in an
interactive shell session will leak the PAT to your shell’s history (i.e.
someone could retrieve the PAT simply by looking at your command line history).
Most shells have settings that allow turning-off the logging of command history.
Here are some suggestions of how to do so for the bash shell:
Turn-off history recording for the entire shell session:
unset HISTFILE
Temporarily turn-off history recording:
# Turn off shell history recording.
set +o history

# Run your commands. They will not be saved to your history file.
sett encrypt --pat pat-vy0TY_lQNT3Yg-kw6rka5FGea2rjXx7RToHDZ_xnKsw ...

# Turn history recording back on.
set -o history
Example: passing a PAT via the SETT_PORTAL_PAT environment variable.
# Temporarily turn-off shell history recording while setting the environmental
# variable that stores the PAT.
set +o history
export SETT_PORTAL_PAT=pat-vy0TY_lQNT3Yg-kw6rka5FGea2rjXx7RToHDZ_xnKsw
set -o history

sett encrypt s3-portal \
  --signer SIGNER_KEY --recipient RECIPIENT_KEY --dtr DATA_TRANSFER_ID \
  FILES_OR_DIRECTORIES_TO_ENCRYPT
Example: passing a PAT via the --pat command line option.
# Turn-off history recording to avoid leaking the PAT.
unset HISTFILE

sett encrypt s3-portal \
  --signer SIGNER_KEY --recipient RECIPIENT_KEY \
  --dtr DATA_TRANSFER_ID  \
  --pat pat-vy0TY_lQNT3Yg-kw6rka5FGea2rjXx7RToHDZ_xnKsw \
  FILES_OR_DIRECTORIES_TO_ENCRYPT
For BioMedIT users, sett provides an authenticated mode that simplifies the encryption and transfer process by:
To enable this mode, go to the Profile tab and click “Sign in”. You will be redirected to the BioMedIT authentication system. After successful authentication, proceed to the Encrypt and Send Data tab.
In the Encrypt and Send Data tab, complete the following:
Data to encrypt and/or send: using the Files and Folders buttons, select at least one file or directory to encrypt. Alternatively, files and directories can also be dragged and dropped into the sett application.
Sender: select your own OpenPGP key (you are the data sender). For most users, there should be only one key in the Sender drop-down menu: their own key.
Recipients: add one or more recipients by selecting them from the drop-down list. Recipients are people for whom data should be encrypted: their public OpenPGP key will be used to encrypt the data, and only they will be able to decrypt it.
Data Transfer ID: Data Transfer Request ID associated with the data package that is being encrypted.
For data not intended to be sent into the BioMedIT network, the Data Transfer ID field is optional and can be left empty or set to any arbitrary value. For non-BioMedIT transfers, the Verify package checkbox must also be disabled in the Settings tab.
Extra Metadata: this input is only visible when Enable extra metadata is enabled in the Settings tab.
Allows to optionally add additional metadata to the data package in the form of key-value. Extra metadata are stored in the metadata file of the data package.
After inserting the key and value, click the + button (or hit “Enter”) to add the new entry. You can add multiple key-value pairs.
Destination: destination where to encrypt (and send) the data.
When encrypting to a remote destination, a number of options must be specified. Please refer to remote destination options for details.
You are now ready to create an encrypted data package: click Encrypt data or Encrypt and send data if you are encrypting to a remote S3 or SFTP destination.
A pop-up will appear, asking for the password associated with the sender’s key. After the password is entered, data compression and encryption will start.
Progress, success, and error messages for each submitted task are displayed in the Tasks tab.
Encrypting (or encrypting and sending) data is done via the sett encrypt
command. If you already have an encrypted data package on your local file system
and want to send it to a remote destination, use the sett transfer
command. Both commands share the same options for specifying the remote
destination.
# General syntax:
sett encrypt local --signer SENDER --recipient RECIPIENT --dtr DATA_TRANSFER_ID --output OUTPUT_FILENAME_OR_DIRECTORY FILES_OR_DIRECTORIES_TO_ENCRYPT

# Example (long command line options):
sett encrypt local --signer alice@example.com --recipient bob@example.com --dtr 42 --output . ./file_to_encrypt.txt ./directory_to_encrypt

# Example (short command line options):
sett encrypt local -s alice@example.com -r bob@example.com -dtr 42 -o . ./file_to_encrypt.txt ./directory_to_encrypt
Description of the most used sett encrypt arguments:
--signer and --recipient: data sender and data recipient(s).
Values can be specified either as an OpenPGP key fingerprint, or an
email address. Multiple recipients can be specified by repeating the
-r/--recipient argument:
# In this example, Alice encrypts data for both Bob and Chuck.
sett encrypt local -s alice@example.com -r bob@example.com -r chuck@example.com -o . FILES_OR_DIRECTORIES_TO_ENCRYPT
--dtr: Data Transfer Request ID value associated with the data being
sent. For non-BioMedIT transfers, this argument is optional.
--output: an optional argument for specifying the location and/or name
for the encrypted output file. It can be one of the following:
stdout. This can e.g. be
useful to pipe the data into another application.Adding the --check option runs the encrypt command in the test mode,
i.e., checks are made but no data is encrypted or sent.
If the --verify option is passed, sett performs Data Transfer ID
verification. For non-BioMedIT-related transfers, --verify should not be
passed.
To automate the encryption process and avoid interactive prompts from the sett CLI - e.g. to ask for an OpenPGP key password - please refer to the section on automating the sett CLI.
In the sett encrypt command, the local subcommand can be replaced with
s3-portal, s3 or sftp to encrypt and send data directly to a
remote destination in a single command.
Encrypting data directly to a remote location is encouraged, as it has important benefits.
sett encrypt s3-portal
subcommand, which enables the sett
authenticated mode.
For more information about remote destination options in non-authenticated mode, please refer to the remote destination options section.
Example command for non-authenticated encryption to an S3 object store:
sett encrypt s3 \
  -s alice@example.com -r bob@example.com \
  --endpoint https://minio.my-node.ch --bucket my-project \
  --access-key 23VO8RB2SIB2SF8EUL9V \
  --secret-key wvrt7YoTTERGftf0zWnppWYSdcGplNtxuLHMn7op \
  --session-token eyJhbGciOiJIUzUxMiIsInR5cCI6IkpXVCJ9eyJhY2Nlc3NLZXkiOiI5Vk84\
                  UkIyvimUMlKIFUVVTDc3WSIsImF0X7hhc2giOiIyRnVlZ3JmSjhTUWFXYkw2\
                  V0puekF3IiwiYXVkLjpbIm1pbmlvIl0sImF1dGhfdGltTRI6MTcyMTezODIx\
                  MywiZXhwIjoxNzIx0DMxODEzLCJpYXQiOjE3MjE4MzfiLKLsImlzwqI6Imh0\
                  dHBzOi8vcD3ydGFsLXN0YWasfmcuZGNjLnNpYi5zd2lzcy9hdXRoL38hdXRo\
                  IiwibmFtZSI6ImJpd2ciLCJqt5xpY5kiOiJjb25zb2xlQWRfgW4iLCJzdWIi\
                  OiIxOSJ9.PcvXcAli5Bz8ete1T265TPB1cbfgX7k8NDXU5gXy1nflxq203cG\
                  5qwAF9Oxyn1mKmwa87jsHj8HU2VUY9p5S1Q \
  FILES_OR_DIRECTORIES_TO_ENCRYPT
Data compression algorithm can be changed using the --compression-algorithm
flag. The available options are:
zstandard (default), optimal compression and speed.gzip, available for compatibility with older versions of sett.stored, no compression.The data compression level used by sett can be manually adjusted using the
--compression-level option. Possible values depend on the selected compression
algorithm:
zstandard (default: 3)
gzip (default: 6)
You can access the interactive mode by running the sett command without any
arguments.
Decrypt and decompress encrypted data packages. Only .zip files that follow
the sett packaging specification can be
decrypted with sett.
Please note that:
To decrypt data, you must therefore have in your local keyring:
To decrypt and decompress a file, go to the Decrypt tab and perform the following steps:
Data package: the data package to decrypt. Start by selecting the source where the data package is located via the drop-down menu: either local or s3.
Destination directory: select a location where to decrypt/decompress the file.
By default, output files are saved to the user’s home directory. This default behaviour can be modified under Default output directory in the Settings tab.
Click Decrypt package to start the decryption and decompression process. A pop-up dialogue will prompt you for the password associated with the OpenPGP key for which data was encrypted.
In the CLI, data decryption is done via the sett decrypt command:
# General syntax:
sett decrypt local --output OUTPUT_DIRECTORY ENCRYPTED_FILES.zip

# Example:
sett decrypt local --output /home/alice/data/unpack_dir /home/alice/data/test_data.zip
Some useful sett decrypt arguments:
local subcommand can be replaced with s3-portal or s3
to decrypt data packages
directly from an S3 object store.--decrypt-only /
-d option.--output / -o is omitted, the data is decrypted to the current
working directory.To automate the decryption process and avoid interactive prompts from the sett CLI - e.g. to ask for an OpenPGP key password - please refer to the section on automating the sett CLI.
The sett TUI interactive mode is accessed by running the sett command
without any arguments.
When using an S3-compatible object store as destination (in non-authenticated mode), the following options must be specified:
When using an SFTP server as destination, the following options must be specified:
Listing data transfer requests (DTRs) and data packages requires authentication with the BioMedIT Portal. The functionalities described on this page are therefore only relevant for BioMedIT users.
Furthermore, this section is only relevant for the sett CLI (command line interface of sett), as the listing of DTRs and data packages in sett GUI and sett TUI is done automatically whenever necessary.
DTRs for which a user is either a data provider or a data recipient can be listed with the following command:
sett portal dtr
As this operation requires authentication with the BioMedIT Portal, sett CLI will prompt the user for an interactive authentication with Portal.
Data Packages available for download and decryption for a given user can be listed with the command:
sett portal packages
As this operation requires authentication with the BioMedIT Portal, sett CLI
will prompt the user for an interactive authentication with Portal. This step
can be skipped by passing a Portal PAT (personal access token) to the command
via the --pat argument.
# Authenticating via a Portal PAT (personal access token).
sett portal packages --pat pat-xxxxxxxxxxxxxxxxxxxxxxxxxxxxxxxxxxxxxxxxxxx
The sett portal packages command can e.g. be used to automate the detection
of new packages and their download and decryption.
SSH (Secure SHell) keys are pairs of small text files that are used to securely identify users and give them access to remote servers, e.g. when sending data via SFTP.
SSH keys use public-key encryption and always come in pairs: a public and a private (or secret) key.
Generating a new pair of SSH keys must be done only once, and, in the context of sett, is only needed if you intend to send data. If you are a user who only decrypts data, you do not need an SSH key.
Also, do not confuse SSH keys - used to identify yourself on a remote server - with OpenPGP keys - used to encrypt and sign data.
To generate a new SSH key pair, type the command below in your terminal (Linux
and Mac) or PowerShell (Windows users - to start it, search for “powershell”
in the Start menu). Note that you must replace "alice@example.org" with your
own email. This will generate an SSH key pair using the
ed25519 algorithm, currently the most
secure public-key algorithm:
ssh-keygen -a 100 -t ed25519 -C "alice@example.org"
Windows users who do not have the ssh-keygen command installed, please see section below.
When executing the ssh-keygen command above, you will be prompted for the following information:
~/.ssh/id_ed25519 on
Linux and MacOS, and C:\Users\%username%\.ssh\id_ed25519 on Windows.When the command completes, two new files are produced: id_ed25519.pub (the
public key) and id_ed25519 (the private key).
id_ed25519) must be kept
secret. Never share it with anyone, not even your system administrator.
On Linux and MacOS systems, after the public key is generated, its permissions must be changed with the following command (this step is not needed for Windows users):
chmod 600 ~/.ssh/id_ed25519.pub
Not all versions of windows come with the ssh-keygen command pre-installed. If this command is unavailable on your machine, please install it as follows:
Even though it is possible to create an SSH key pair using a password containing non-ASCII characters, it seems like those characters are encoded differently between different operating systems.
As an SSH key might be moved to a machine with another operating system, or encoding might change with a new version, it is impossible to guess the correct encoding in any case. For this reason, we recommend not to use non-ASCII characters to protect SSH private keys.
In order to simplify the data transfer process, sett offers an authenticated mode. Once the user is authenticated, the following functionalities are offered:
The authenticated mode in sett implements a so-called device authorization flow, an authorization mechanism usually used by electronic devices with internet connection that lack any input capacities. In both the CLI and GUI of sett, the user is asked to visit a specific website (an OIDC provider) to identify himself. While the user is logging in, the device (in our case: sett) is periodically polling the website, until the user has successfully logged in. sett then receives a JWT token (JSON Web Token) from the OIDC provider, which allows it to fetch additional data from Portal, e.g. the list of available data transfers for the logged-in user, as well as the credentials used for transferring data to and from the S3 object storage.
The diagram below illustrates how this device authorization flow works in sett when requesting the list of available DTRs or when up/downloading data.
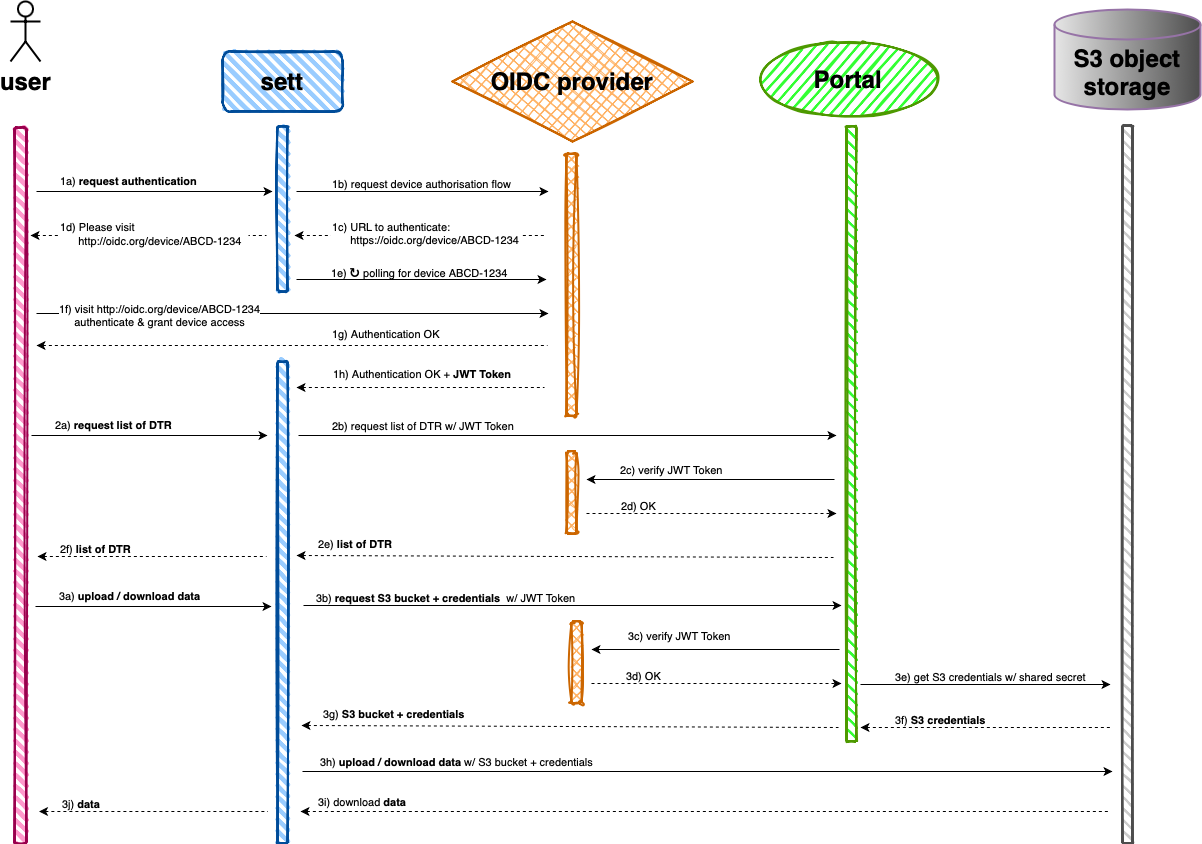
Device authorization flow as implemented by sett
The sett desktop app allows a number of options to be customized via its Settings ⚙️ page. For instance, you may change the default output directory, or enable/disable package verification before a transfer.
Each setting has a predefined default value, which is used when first running the tool or if loading the current settings fails for any reasons.
Changes made to Settings become effective immediately. Changes can be reset back to their factory default by clicking on the Reset settings button.
Settings are divided into three sections: “basic”, “advanced”, and “non-editable”. Some settings in the GUI can also be modified via shell environment variables.
When enabled (the default value), the following checks are made before encrypting or sending data:
<project_code>_<date_format>.zip. This ensures no sensitive information
is mistakenly included in the file name.Note that that some of the above checks require communication with the BioMedIT portal. When using sett outside of a BioMedIT project, this setting should therefore be disabled.
When enabled (the default value), sett checks for new versions
at startup and notifies the user if an update is available. This GUI setting
can be overridden by the environment variable SETT_CHECK_FOR_UPDATES, in
which case it will appear as disabled in the Settings ⚙️ page. See the
GUI environment variables section for details.
Default destination directory for operations such as encryption to the local filesystem or decryption. User’s home directory is used by default.
When enabled, additional metadata can be added to the package in the data encryption form.
URL of the OpenID Connect issuer used for authentication (BioMedIT specific).
URL of a BioMedIT portal instance. Portal is used for key approval verification, DTR (Data Transfer Request) validation, and retrieval of data associated with a given DTR (when sett is being used in authenticated mode). The default value of this setting is: https://portal.dcc.sib.swiss.
Directory where public OpenPGP keys are stored.
Directory where private OpenPGP keys are stored.
This section displays values of setting that cannot be modified by the user. These settings are displayed here for convenience. They can be copied to the clipboard via a dedicated “copy to clipboard” button.
Directory where log files are stored. Location of the log directory depends on the operating system:
${XDG_DATA_HOME}/ch.biomedit.sett/log or $HOME/.local/share/ch.biomedit.sett/log$HOME/Library/Application Support/ch.biomedit.sett/log{FOLDERID_RoamingAppData}\ch.biomedit.sett\logURL of the OpenPGP key server used to retrieve and publish public keys. The default value is https://keys.openpgp.org.
The following shell environment variables can be used to modify settings in sett GUI.
SETT_CHECK_FOR_UPDATESWhen enabled, sett GUI checks for new versions at startup and notifies the user if an update is available.
The following values are allowed for this variable:
1, "true" or "yes".0, "false" or "no".SETT_CHECK_FOR_UPDATES=0 or
SETT_CHECK_FOR_UPDATES="false", the checks for updates are disabled in the
GUI, regardless of the “Check for updates” setting value chosen in
Settings ⚙️.The sett-cli is stateless by design, meaning that there is no persistent
configuration file where settings can be modified and stored.
Instead, settings can be set via the following shell
environment variables. All settings are optional and have a default value.
SETT_OPENPGP_KEY_PWDPassword to unlock the secret OpenPGP key used to decrypt or sign data. When this environmental variable is set, sett uses its content instead of interactively asking the user to enter a password.
SETT_OPENPGP_KEY_PWD_FILEFull path and name of a file containing the password to unlock the secret OpenPGP key used to decrypt or sign data. When this environmental variable is set, sett uses its content instead of interactively asking the user to enter a password. The file containing the password should not be encrypted.
SETT_PORTAL_PATPersonal Access Token (PAT) to authenticate with the BioMedIT Portal. When this variable is set to a valid PAT, sett CLI automatically authenticates with Portal, skipping the need for interactive (browser-based) login. BioMedIT users can generate a PAT in their profile on the BioMedIT portal.
SETT_PORTAL_URLURL of the BioMedIT Portal instance to be used. For details see the description of the GUI Portal URL setting. This setting defaults to https://portal.dcc.sib.swiss.
SETT_OIDC_CLIENT_IDClient ID with which sett should identify with the OpenID Connect issuer
(see SETT_OIDC_ISSUER_URL). Only relevant when using sett in authenticated
mode. This setting defaults to sett.
SETT_OIDC_ISSUER_URLURL of the OpenID Connect issuer used when authenticating with the BioMedIT Portal. Only relevant when using sett in authenticated mode. This setting defaults to https://login.biomedit.ch/realms/biomedit.
SETT_KEYSTOREDirectory where private OpenPGP keys are stored. Location is platform dependent:
${XDG_DATA_HOME}/sequoia/keystore or $HOME/.local/share/sequoia/keystore$HOME/Library/Application Support/org.Sequoia-PGP.sequoia/keystore{FOLDERID_RoamingAppData}\org.Sequoia-PGP.sequoia\keystorePGP_CERT_DDirectory where public OpenPGP keys are stored. Location is platform dependent:
${XDG_DATA_HOME}/pgp.cert.d or $HOME/.local/share/pgp.cert.d$HOME/Library/Application Support/pgp.cert.d{FOLDERID_RoamingAppData}\pgp.cert.dSETT_METADATA_EXTRAAdditional metadata to be included in the data package.
Extra fields must be provided in the form of key=value pairs separated by a
comma and without spaces.
For example: SETT_METADATA_EXTRA="foo='value 1',bar=value_2"
Configuration for S3 connections and long-term credentials can be stored in AWS configuration files. This approach is particularly beneficial if certain S3 instances are accessed frequently.
The location of an AWS configuration file varies depending on the operating system.
For instance, on UNIX systems, it should be located at ~/.aws/credentials
For more details, refer to the
official documentation.
Access to credential files should be restricted. Configuration files containing access credential must be protected from unauthorized access.
For instance, on UNIX systems use correct file permissions: -rw------- (0600).
Here is an example of a configuration file that defines two profiles:
default and remote.
[default]
endpoint_url = http://localhost:9000
aws_access_key_id = akIA3r4ND0m9V317
aws_secret_access_key = bNdlJ8pXzVr7q8RmZHg6tQf2GtKzG3Ex

[remote]
endpoint_url = https://s3.example.org
aws_access_key_id = tjIA3r4ND0m9Vb7n
aws_secret_access_key = xzVr7q8RmZHg6tQf2GtKzG3ExbNdlJ8p
# For technical reasons, the `region` is required for non-default profiles.
# The value itself is ignored, so it can be set to any value.
region = remote
When a configuration file is present, you can execute sett’s s3
commands without specifying the --endpoint, --access-key, --secret-key,
and --session-token arguments. When using the default profile, the --profile
argument is also not required.
sett compresses, encrypts, and packages files in a single .zip file whose
specification is described below. Only files adhering to these specifications
can be sent or decrypted by sett, and failure to comply with the
specification will generate an error.
sett .zip files have the following structure:
YYYYMMDDThhmmss.zip
├── metadata.json
├── metadata.json.sig
└── data.tar.gz.gpg
    └── data.tar.gz
        ├── content/
        |   ├── [file1]
        |   ├── [file2]
        |   └── ...
        └── checksum.sha256
metadata.jsonMetadata file containing the following information:
transfer_id: numeric ID associated to each named data transfer.
In authenticated mode, or if verify package is activated, sett
checks via Portal that the sender is associated with the given data
transfer and verifies the data transfer is valid and authorized.sender: fingerprint of the sender’s public OpenPGP key,
a 40-character hexadecimal string.recipients list of fingerprints of the recipients’ public
OpenPGP keys, i.e. a list of 40-character hexadecimal strings.timestamp: point in time when a metadata file was generated. Uses the
RFC 3339 format,
e.g. 2024-09-03T14:06:32.675879Zchecksum: checksum/hash value computed on data.tar.gz.gpg, the file
containing the compressed and encrypted data. This checksum allows to verify
the integrity of the data.tar.gz.gpg file without having to decrypt and
unpack it.checksum_algorithm: algorithm used to compute checksum.
Currently SHA256 is used, where SHA stands for Secure Hash Algorithm
256 bits (64 characters). The checksum of any data package –
regardless of its size – is therefore always 64 characters.compression_algorithm: algorithm used to compress the data before
encryption in order to decrease a data package’s size and ultimately
speed up the transfer time.
sett uses zstandard by default, which is currently
the fastest compression algorithm available. Other options are gzip
and stored (no compression).purpose (optional): intended use for the data package.
Values can be PRODUCTION, TEST, or null (optional).version: version of the sett package specifications (not to be
confused with the version of sett itself).
The sett application is designed to be backwards compatible with
older sett packages.extra (optional): additional, custom information regarding this
data package. Must be given in a key-value format (see example below).
Both keys and values are strings. To be able to add additional information
to a sett package, you need to
[x] Enable extra metadata
in the sett settings before encrypting data.metadata.json.sigDetached PGP signature for the metadata.json file.
data.tar.gz.gpgCompressed and encrypted tarball containing the data. This file is produced by performing the following steps (in this order):
.tar
archive file..tar file with compression_algorithm.To improve speed and minimizes disk space usage, sett performs the above operations as a continuous stream, without creating any intermediate files.
[file1], [file2], …Data files to be encrypted. Data files can be of any format, e.g. .txt,
.csv, .dat.
checksum.sha256sha256 checksum file of all files present in data.tar.gz. This is used to
make sure nothing was corrupted during the encryption/transfer/decryption
process.
Examples of the content and structure of the metadata and checksum files.
metadata.json
{
  "transfer_id": 42,
  "sender": "AAABFBC698539AB6CE60BDBE8220117C2F906548",
  "recipients": ["D99AD936FC83C9BABDE7C33E1CF8C1A2076818C3"],
  "timestamp": "2020-01-29T15:31:42+0100",
  "checksum": "a8eb0ee5a6a53326b1c6f9bf94136da5d98a1dc6dceee21d62f694d71c4cf184",
  "checksum_algorithm": "SHA256",
  "compression_algorithm": "gzip",
  "purpose": "PRODUCTION",
  "version": "0.7",
  "extra": {
    "key1": "value1",
    "key2": "value2"
  }
}
checksum.sha256
41421f0c4a5353a5a0cdd37de3fd80a840a190ca997ad8044a67c4c1683f7b63 file1.csv
35ba157ed1c3269d731a438c466790a4f481bb49805e2d1f380df0c636792ff6 folder1/file.txt
fd9ebdbcc1a5fc35ded6e78a6b16ef658502c9d0b05dd4a2185d0f94ccf165cf folder1/folder2/file.txt
In addition to the desktop app and a standalone CLI tool, sett is also distributed as a Docker image, which can be used to run the tool in a containerized environment. This page provides instructions on how to use the sett Docker image.
All images are available in the GitLab container registry.
Pull an image with the following command:
# You can replace 5.11.0 with a specific version you need.
docker pull registry.gitlab.com/biomedit/sett-rs/sett:5.11.0
# Tag the image for easier referencing in later commands.
docker tag registry.gitlab.com/biomedit/sett-rs/sett:5.11.0 sett:5.11.0
To start the interactive mode (TUI), run:
docker run -it --rm sett:5.11.0
Use --help for information on available non-interactive subcommands:
docker run -it --rm sett:5.11.0 --help
Most sett commands require access to the public and private OpenPGP keys. Keys can be provided in two ways:
--signer-path and --recipient-path flags
in the encrypt and decrypt subcommands).When using individual key files, mount the directory containing these files as a volume in the container (or mount individual files):
docker run -it --rm -v ./openpgp:/openpgp:ro -v ./data:/data \
sett:5.11.0 encrypt local -S /openpgp/alice.pgp -R /openpgp/bob.pgp -o /data /data/README.md
Key stores can be mounted in a similar way. However, they must be mounted at the specific location within the container.
docker run --rm \
-v ./pub_store:/root/.local/share/pgp.cert.d \
-v ./priv_store:/root/.local/share/sequoia/keystore \
sett:5.11.0 keys list
If you want to use custom locations for the key stores, you can specify them using environment variables. For more information on key store location see CLI settings.
docker run --rm \
-e PGP_CERT_D=/certificate_store \
-e SETT_KEYSTORE=/keystore \
-v ./pub_store:/pub_store \
-v ./priv_store:/priv_store \
sett:5.11.0 keys list
Encryption and decryption subcommand might need a password for unlocking the secret OpenPGP key. This can be provided as an environment variable (see CLI settings):
# Password as an environment variable
docker run -it --rm -v ./openpgp:/openpgp:ro -v .:/data \
-e SETT_OPENPGP_KEY_PWD="secret" \
sett:5.11.0 encrypt local -S /openpgp/alice.pgp -R /openpgp/bob.pgp -o /data /data/README.md

# Password from a file
docker run -it --rm -v ./openpgp:/openpgp:ro -v .:/data \
-e SETT_OPENPGP_KEY_PWD_FILE=/pgp_key_pwd \
-v ./password_file:/pgp_key_pwd:ro \
sett:5.11.0 encrypt local -S /openpgp/alice.pgp -R /openpgp/bob.pgp -o /data /data/README.md
To report a problem with sett or if you have a question not covered in the present documentation please open an issue on our public GitLab repository https://gitlab.com/biomedit/sett-rs/-/issues
On Windows, you can check if you are using a proxy server to access the Internet by going to Start > Settings > Network & Internet > Proxy (Windows 10). If the slider under Use a proxy server is “off”, no proxy is being used.
If you are told that you need to set a proxy, input the Address and Port details and click Save. When in doubt, please consult your IT department.
On Mac OS the proxy information is located under the System Preferences > Network > Advanced > Proxies tab of the network interface, usually Ethernet or Wi-Fi.
In order to run sett behind a proxy, the shell environment variable
ALL_PROXY or HTTPS_PROXY must be set. This is the recommended and global way
to specify a proxy. Note that, while certain programs support a proxy option
(e.g. pip with --proxy), there is currently no such option in sett.
Example:
ALL_PROXY=https://host.domain:port sett-gui
Yes, it does. sett logs are stored in the following locations:
${XDG_DATA_HOME}/ch.biomedit.sett/log or $HOME/.local/share/ch.biomedit.sett/log$HOME/Library/Application Support/ch.biomedit.sett/log{FOLDERID_RoamingAppData}\ch.biomedit.sett\logLog files are rotated daily and named according to the following format:
<date>.<app>.jsonl. For example, 2024-08-29.sett-gui.jsonl and
2024-08-29.sett.jsonl for GUI and CLI applications respectively.
Each line within the log file is a JSON object corresponding to a single
logging event.
The interactive TUI mode of sett requires a terminal window with a minimum size of 68 x 32 (columns x rows). For the best experience, we recommend using a terminal window that is at least 120 x 48.
If your terminal window is too small, some user interface components may not be visible. To resolve this, increase the size of your terminal window until the interface displays correctly.
This issue occurs when unlocking an OpenPGP key stored in the GnuPG keyring
while using pinentry-curses,
a terminal-based password input program (pinentry).
To fix this, try one of the following solutions:
pinentry program, such as pinentry-gtk,
pinentry-gnome3, pinentry-qt5, or pinentry-mac.sett is licensed under the GPLv3 (GNU General Public License) and the source code is available at https://gitlab.com/biomedit/sett-rs
sett is developed as part of the BioMedIT project.
The benchmarks were run on an Apple Silicon M3 machine with 16-Core CPUs, 128GB memory, and 2TB disk. Version 5.2.0 of sett CLI was used.
One single binary file was used, with default compression (Zstandard, level 3). Decreasing the compression level and/or using text data will influence the results.
Transfer speed is highly dependent on the infrastructure connecting the data sender and recipients. In these benchmarks, data was transferred to the same machine sending the data, therefore representing a best-case scenario in terms of transfer speed.
The table and figure below present throughput speeds for different sett workflows, all values are averages of 5 runs performed with hyperfine:
| Workflow | Throughput (MB/second) | Throughput (GB/minute) |
|---|---|---|
| Encrypt local | 230.65 | 13.84 |
| Encrypt S3 | 179.98 | 10.8 |
| Encrypt SFTP | 119.79 | 7.19 |
| Transfer S3 | 478.68 | 28.72 |
| Transfer SFTP | 123.49 | 7.41 |
| Decrypt local | 244.74 | 14.68 |
| Decrypt s3 | 205.22 | 12.31 |
Throughput as function of file size: as can be seen, the curves in the figure below are linear, indicating that the throughput is constant regardless of the file size.

(click on the figure to enlarge)